1. 说明
本机为 PC 机,系统为 Windows 10,模拟器为 GNS3 2.2.3
- 一个无线网卡(
192.168.0.108),用于 PC 连接互联网 - 一个有线网卡(
192.168.0.104),用于关联 Cloud 节点 - VMware 虚拟机,每台虚拟机配置一个网卡
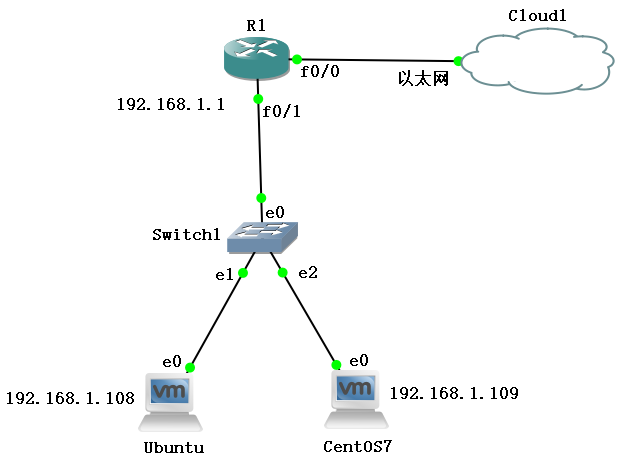
2. Cloud 节点配置
Cloud 节点与有线网卡关联,以连接互联网
3. 路由器联网
路由器接口
f0/0连接 Cloud 节点关联的以太网卡为接口
f0/0配置 DHCP,动态获取 IP 地址1
2
3
4
5R1# conf t
R1(config)# int f0/0
R1(config-if)# ip address dhcp
R1(config-if)# no shutdown
R1(config-if)# end得到地址:
192.168.0.1031
2R1#
*Feb 25 10:21:06.959: %DHCP-6-ADDRESS_ASSIGN: Interface FastEthernet0/0 assigned DHCP address 192.168.0.103, mask 255.255.255.0, hostname R1为路由器配置 DNS,用于解析域名
1
2
3
4R1# conf t
R1(config)# ip domain-lookup
R1(config)# ip name-server 8.8.8.8
R1(config)# end
测试路由器是否连接互联网,成功
1
2
3
4
5
6
7
8R1# ping www.baidu.com
Translating "www.baidu.com"...domain server (192.168.1.1) [OK]
Type escape sequence to abort.
Sending 5, 100-byte ICMP Echos to 14.215.177.39, timeout is 2 seconds:
!!!!!
Success rate is 100 percent (5/5), round-trip min/avg/max = 12/27/32 ms
4. 内部网络配置
内部网络包含两台在同一网段的虚拟机,IP 地址分别为:192.168.1.108、192.168.1.109
用一台交换机将它们和路由器接口 f0/1 连接。
4.1 虚拟机配置
4.1.1 导入 VM 虚拟机
在 VMware 中创建两台虚拟机,分别为 Ubuntu 16.04 和 CentOS 7
在 GNS3 中导入两台虚拟机,注意勾选:
Allow GNS3 to override non custom VMware adapter在 VMware 中点击 “编辑 - 虚拟网络编辑器”,添加供 GNS3 使用的网卡,注意选择仅主机模式并禁用DHCP。或者在 GNS3 中点击 “Preference - VMware - Advanced local settings - Configure” 选项,调用
gns3vmnet自动完成。
(由 GNS3 启动虚拟机后,会为虚拟机自动配置网卡)
GNS3 will randomly select an available Host-only VMnet to bridge the VMware virtual machine into the GNS3 topology. VMnet 0 (bridged), VMnet 1 (host-only), and VMnet 8 (NAT) are available in VMware by default, but will not be used by GNS3 for this purpose!
It is important that any new Host-Only VMnet created for GNS3 to use have the default DHCP for it disabled!
4.1.2 配置 IP 地址
- IP:
192.168.1.108(192.168.1.109) - mask:
255.255.255.0 - gateway:
192.168.1.1 - DNS:
8.8.8.8
两台虚拟机的网关就是路由器接口 f0/1,为其配置 IP 地址:
1 | R1# conf t |
4.1.3 测试虚拟机联网
1 | ping 192.168.0.103 |
能 ping 通路由器另一端,但 ping 不通与路由器在同一网段的无线网卡,不能连接互联网,需要配置 NAT。
4.2 NAT 配置
4.2.1 内外端口定义
1 | R1# conf t |
4.2.2 NAT 配置方式
可以选择:静态 NAT 配置、端口复用、动态 NAT 配置。
1. 静态 NAT 配置:ip nat inside source static 内部私有IP地址 公网地址
1 | R1(config)# ip nat inside source static 192.168.1.108 192.168.0.118 |
2. 端口复用
1 | // 建立允许内网IP网段进行NAT转换的ACL |
1 | R1(config)#access-list 1 permit 192.168.1.0 0.0.0.255 |
3. 动态 NAT 配置
1 | // 建立允许内网IP网段进行NAT转换的ACL |
1 | R1(config)#access-list 1 permit 192.168.1.0 0.0.0.255 |
在虚拟机上测试互联网连接,成功
1 | ping www.baidu.com |
5. 保存配置
1 | R1# write memory |